What Causes Water Hammer & How to Fix It
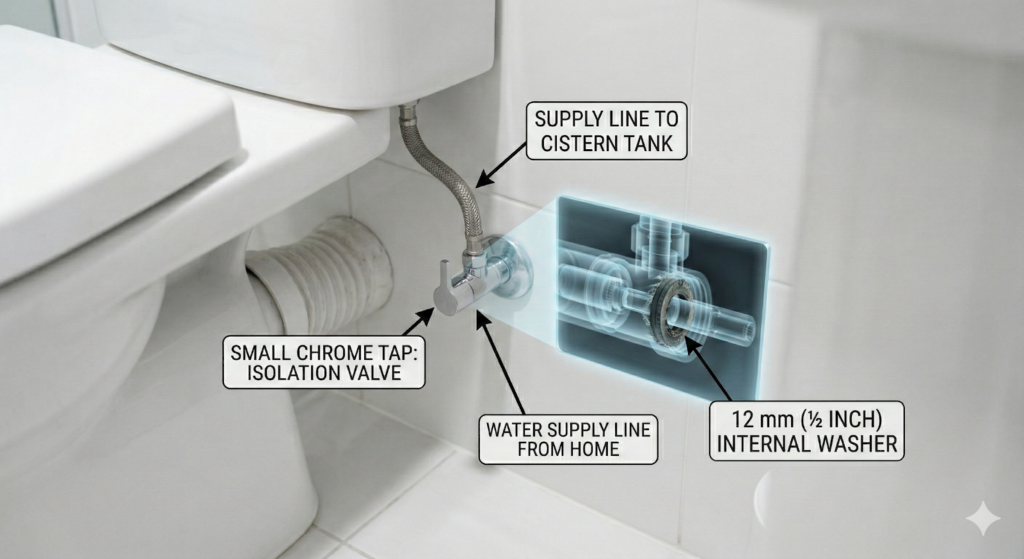
Water Hammer – that loud bang every time your washing machine, dishwasher, or toilet shuts off is caused by a pressure surge that occurs when moving water suddenly stops inside your plumbing. Every day that it goes unfixed, that pressure surge places stress on pipe joints, valves, appliance hoses, and fittings. This repeated shock can eventually lead to leaks or premature component failure. The tricky part is that the same noise can have several different causes. Instead of jumping straight to a water hammer arrestor, this guide will help you diagnose the problem first, match it with the right repair, and know when it’s time to call a plumber. TL: DR 5 Most Common Causes of Water Hammer The same banging noise water hammer causes can have several different underlying reasons, so the right fix depends on what’s really creating the pressure surge. 1. Fast-Closing Valves and Appliances If the banging started after you installed a new washing machine, dishwasher, refrigerator with an ice maker, or even a new toilet fill valve, that appliance is the first place to look. These fixtures use electrically operated solenoid valves that shut off almost instantly. When fast-moving water stops in a fraction of a second, it creates a pressure surge that travels back through the pipework. Older mechanical valves closed more gradually. Modern solenoid valves are designed for fast, precise water control, which means upgrading an appliance can introduce water hammer even when nothing else in your plumbing has changed. 2. High Water Pressure If the banging happens at several fixtures throughout the house, high water pressure is one of the first things to rule out. High water pressure doesn’t cause water hammer on its own, but it makes every pressure surge more forceful. A problem that is barely noticeable at normal pressure can become much louder as the pressure rises. Pressure consistently above 550 kPa (80 psi), unusually strong tap flow, leaking pressure relief valves, and plumbing fixtures that wear out prematurely are all common signs that household water pressure is too high. 3. Waterlogged Air Chambers or Missing Cushioning If the hammer has gradually become louder over time, particularly in an older home, the plumbing may no longer have enough cushioning to absorb pressure surges. Many older plumbing systems use vertical air chambers that trap a pocket of air to absorb hydraulic shock. Over time, those chambers can fill with water, leaving little or no air to cushion the pressure surge. Some homes don’t have an air chamber or water hammer arrestor near fast-closing fixtures at all. Without that protection, the pressure wave travels through the pipework and creates the familiar banging noise. 4. Loose Pipework or Worn Valves If the noise seems to come from inside a wall or ceiling, the pipes may be moving more than the pressure surge itself. Even a relatively small pressure surge can cause unsupported pipes to strike wall framing, ceiling joists, or neighbouring pipes, making the bang much louder than it would otherwise be. Worn shut-off valves, ageing toilet fill valves, and failing appliance valves can also make water hammer worse by closing unevenly or chattering during shut-off. If the noise is limited to one tap or toilet, replacing the faulty valve is often a better solution than installing an arrestor. 5. Trapped Air or Poor Pipe Layout If the banging started after plumbing work or a recent repair, trapped air in the system may be the cause. In some homes, the way the pipework is laid out can also make pressure surges louder. These problems are less common than faulty valves or high water pressure, but they can produce similar symptoms. Diagnose the Problem in 30 Seconds If you notice… The most likely cause Washing machine bangs at the end of a fill cycle Fast-closing solenoid valve Multiple fixtures bang High household water pressure Noise inside one wall Loose pipework Started after a new appliance Missing arrestor or fast-closing valve Arrestor didn’t solve it Pressure problem or another plumbing fault How to Fix Water Hammer The right fix depends on what’s causing the pressure surge. Before replacing parts, identify which fixture is making the noise. Water hammer affecting one appliance usually needs a different repair than hammer affecting the entire plumbing system. 1. Find the Fixture Causing the Noise Start by identifying exactly where the noise is coming from. This quick check usually tells you which repair to try first. How to do it The next step depends on what you found. If the noise is limited to one fixture or appliance, continue to the Local Fixes for a Single Fixture section below. If the noise occurs at multiple fixtures or throughout the house, move to Reduce High Water Pressure first. Noise at multiple fixtures usually points to a plumbing system issue rather than a single faulty fixture. 2. Local Fixes for a Single Fixture Restore Waterlogged Air Chambers If you live in an older home and the hammer developed gradually, restoring the air chambers is a good place to start. How to do it If the hammer returns quickly, the air chambers are no longer providing enough cushioning. Installing a water hammer arrestor is the more reliable long-term fix. Install a Water Hammer Arrestor If the noise only comes from a washing machine, dishwasher, refrigerator, ice maker, or another appliance with a fast-closing valve, a water hammer arrestor is usually the most effective solution. How to do it Use the correct arrestor size for your plumbing system. Replace Worn or Fast-Closing Valves If the hammer is limited to one toilet, tap, or appliance, replacing the valve may solve the problem. How to do it 3. Reduce High Water Pressure If the noise occurs at multiple fixtures or throughout the house, check your household water pressure before replacing anything else. How to do it 4. Secure Loose Pipework Behind Walls and Ceilings Sometimes the pressure surge isn’t the main problem. The noise is caused by pipes moving and hitting the framing or